FAQ - Frequently Asked Questions
Contents
1. Before you Buy/Pre-installation
2. Installation
3. Operation
4. Firmware/Software Updates
1. Before you Buy/Pre-installation
1a: What is the difference between the previous model Dynavin 8 and the Dynavin 9?
Click here for a side-by-side comparison.
1b: Will my steering wheel buttons still work?
Yes! On the Dynavin 8 the CANbus/iBus is integrated into the head unit except on the E39/E46/E53 a iBus/CANbus box is included and simply plugs into the main wire harness. On the Dynavin N7/N7PRO the CANBUS/iBus is integrated into the head unit.
For the Mustang 2010-2014 radios: If the steering wheel controls are not working, check that the 4-pin plug on the main harness is connected to the back of the radio and if it is, unplug it and make sure to plug it in all the way. For N7 Pro models, make sure the plug is the correct direction so it is keyed properly. This is a common install error.
1c: Does the Dynavin come with everything I need?
Yes! The Dynavin includes everything you'll need for installation. But here are some popular add-on options:
USB Extension Cable: If you've selected the options in the drop down menus correctly, you probably won't need anything else. Optional accessories include the USB extension cable so that you can easily access the USB plugs on the back of the unit once it is installed. This allows you to charge your phone or plug in a flash drive loaded with your music. If you have a Mustang 2010-2014 with a factory USB port, the Dynavin will integrate with that so you don't need a USB extension cable. If you have an E46 and are installing the Dynavin relocation bracket with the 2 USB ports, you also don't need a USB extension cable.
Backup/Front Camera: Lastly, since the Dynavin is reverse/front camera-ready, you may also want a backup/front camera. These items can be purchased from our accessories section or as add-ons in the drop down menus on the Dynavin product pages.
1d: Is the Dynavin and truly "plug and play"?
YES! These Dynavin units come with wire harness adapters that match the factory wiring and all the accessory parts needed for standard functionality without having to butcher the car's factory wiring. Dynavin units are cosmetically and physically matched to the vehicle in order to fit and appear stock without any permanent changes. Except for a few minor exceptions, Dynavin units fit without any modification to the vehicle!
Various accessories are also available, backup cameras, flush mount cables, tuners, etc. that may require more extensive installation.
1e: Does the Dynavin support SiriusXM satellite radio?
Yes! The Dynavin 9, 8, and Dynavin N7/N7 PRO are all compatible with SiriusXM with the SiriusXM SXV300 Tuner (sold separately). These units include the SiriusXM tuner adapter cable which plugs into the tuner and the back of the Dynavin (it's all plug and play).
The Dynavin N7-GM2007 PRO is the only radio that does integrate with the factory SiriusXM Tuner if equipped. The Dynavin 8/N7 PRO is not compatible with factory SiriusXM tuners (except for the Dynavin N7-GM2007 PRO radio); the SiriusXM SXV300 Tuner is required for functionality. However, there have been certain cases in which people have used the factory antenna.
Alternatively, you can use the SiriusXM smartphone app and connect your phone via auxiliary input OR and stream the audio to the head unit via Bluetooth.
The previous N6 units do NOT directly support satellite radio; however, you can use the SiriusXM smartphone app and connect your phone via auxiliary input OR and stream the audio to the head unit via Bluetooth. However, in both of these instances, you would have to control SiriusXM from your phone.
2. Installation
2a: What do these labels mean on the USBs and which ones should I use?
Dynavin 9 Plus models: The "MDI & CP" for wired CarPlay/Android Auto, updating the Dynavin's firmware, screen-mirroring, and for a multimedia flashdrive. The "PHONE" USB is for faster charging.
Dynavin 8 Plus models: The "MDI & CP" is for wired CarPlay/Android Auto, updating the Dynavin's firmware, screen-mirroring, and for a multimedia flashdrive. The "PHONE" USB is for charging.
Dynavin 8 Pro models: The "MEDIA" port is for wired Android Auto, updating the Dynavin's firmware, screen-mirroring, and for a multimedia flashdrive. The "PHONE" USB is for charging.
N7 PRO models: For a flash drive or plugging in a smartphone (Android or Apple), use the USB labeled "MEDIA". If you are installing the iLink Pro, use the USB labeled "iLink Pro".
N7 models: For a flash drive or plugging in a smartphone (Android or Apple), use the USB labeled "MEDIA". If you are installing the iLink, use the USB labeled "SYSTEM". The "SYSTEM" USB is also generally compatible with Apple devices.
N6 models: For a flash drive or plugging in your smartphone (Android or Apple), use the USB labeled "MEDIA". If you are installing the iLink, use the USB labeled "INTERNET".
2b: Do I need to ground the "park" wire to make video work while the car is in motion?
No. There is a setting in the radio menu called "Brake." Turn it off to allow video playback while the vehicle is in drive but please drive safely!
2c: My Dynavin is very loud and does not seem to have much volume adjustment.
The Dynavin units have an output level setting to change the output to better match the car's OEM amplifier (if equipped).
If you have an E39 with DSP, go to the "Sound" or "Audio" menu icon > DSP Setting and adjust the slider higher. This will help regulate call volume that is too loud. Do the opposite if too quiet.
If your vehicle does NOT have DSP, go to the "Sound" or "Audio" menu and select "Source Level Adjustment". Here you can adjust various levels by source to your preference.
2d: I hear lots of weird noises, static, beeps, etc...
If you ran the extension cable in your E46, E39, or E53, be careful to note the location of the battery cable in your car. Running the extension harness near the battery cable can cause noise issues particularly when accelerating. Standard practice is to run the signal cables (including the extension harness) down the opposite side of the car from the battery cable.
Depending on the vehicle, you will also want to check the OE DSP Amp setting in the Sound menu. Turn it on and lower it as needed.
See 2c for more.
2e: How do I get my steering wheel buttons to work?
Dynavin 8 and 9 models for Mustang 2005-2014: The iBus/CANbus box is integrated into the head unit. So, as long as everything is plugged in correctly, there's nothing special you need to do. It's always a good idea to make sure you're on the latest firmware version and the car type is set correctly. Check for latest firmware here. If installing into a Mustang 2005-2009 or 2010-2014, make sure the 4-pin plug from the back of the radio is properly plugged into the 4-pin plug on the main wire harness. Instructions can be found here.
Dynavin 8 and 9 for BMW E39/E46/E53: Check that you have plugged in the little black iBus/CANbus interface box; it just plugs into the Dynavin's wire harness. You should hear it click in. That is it. It is only plugged in on the one side not both. It's always a good idea to make sure you're on the latest firmware version and the car type is set correctly. Check for latest firmware here.
N7/N7 PRO models: The Dynavin N7/N7 PRO models have the iBus/CANbus box integrated into the head unit. So, as long as everything is plugged in correctly, there's nothing special you need to do. It's always a good idea to make sure you're on the latest firmware version and the car type is set correctly. Check for latest firmware here.
If installing into a Mustang 2005-2009 or 2010-2014, make sure the 4-pin plug from the back of the radio is properly plugged into the 4-pin plug on the main wire harness. Instructions can be found here.
N6 models: Check that you have plugged in the little black iBus/CANbus interface box; it just plugs into the Dynavin's wire harness. You should hear it click in. That is it. It is only plugged in on the one side not both.
2f: What is the best place to put the external mic?
Many people put them in the stock mic location near the sunroof controls but every car is different. Experiment a bit to find the location that works best for you. Some good places would be near the rearview mirror, or on/near the driver side pillar. Make sure to test it out before finishing the install!
And, yes, you must install it for the Dynavin to be fully functional. The Dynavin is only compatible with the included Dynavin microphone. The factory microphone does not integrate with the Dynavin.
2g: Will the Dynavin work with a backup camera and a front camera?
Absolutely! Universal backup/front cameras are one of the most common accessories installed along with a new head unit. There is a dedicated standard video plug for a front and/or backup camera and a wire that is tied in with the camera power wire so that when the backup camera is activated by the reverse lights, the head unit will automatically switch to the backup camera. Most aftermarket backup/front cameras are compatible with the Dynavin.
Click here for aftermarket camera install help
Note: The Dynavin integrates with a few of the factory backup camera in the Mustang model radios: MST2010, MST2015L (base model), and MST2015H (premium model) and the camera adapters are included. The Dynavin can also integrate with some of the Volkswagen models (camera adapter sold separately).
2h: This plug doesn't seem to match the plug in my car.
Every Dynavin unit comes with the appropriate wire harness adapter to match your car. Some units come with 2 or more plugs to match the possible variations in a few given vehicle applications. Look closely at each plug. It may take trial and error but one of them WILL match up to your car.
If you have a BMW and are using the extension harness, the short adapter harness plugs into the radio plug in the trunk area. Then the extension harness plugs into that and is run to the dash where it plugs into the back of the new head unit. You are no longer using the stock radio module or the CD changer; you are simply connecting the extension cable to the car plug (sometimes a blue end) which is in the trunk for your BMW with OEM navigation. You are bypassing the stock radio module.
For extension cable install instructions, click here.
2i:
2j: How do I fix the interference (lines or black screen) when the backup camera is on while the engine is running?
If you are having interference such as a black screen or lines when in backup camera mode while the engine is running, you will need to power the camera directly off the battery and use a relay to switch it on and off using the reverse light circuit to switch the relay. See 2k to ensure the backup camera is wired correctly.
3. Operation
3a: The Dynavin screen gives me a warning message when I try to watch YouTube or a video?
Go into the settings menu and turn off the setting labeled "Brake". Please drive safely!
3b: Why is the time wrong on the radio screen?
The time is set by the GPS satellites so good GPS reception is a necessity and you must set the "Time Zone" in the "System" menu. (See image below for your time zone setting. Daylight Savings Time is depicted below. Add -1 for standard time.)
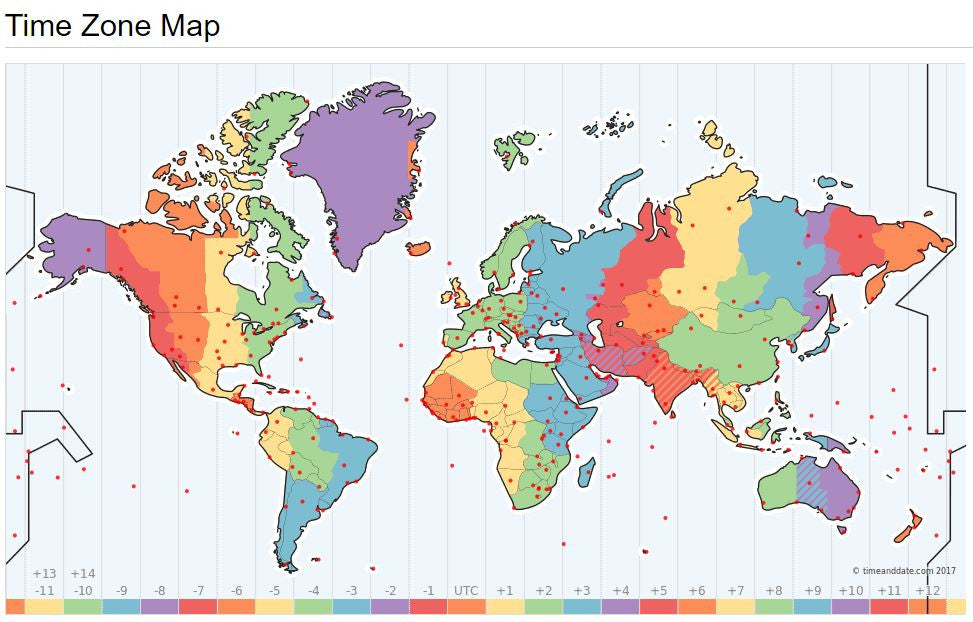
Visit https://www.timeanddate.com/time/map/ to search by specific location.
3c: Where is the setting to make the time 12 hour instead of 24?
Dynavin 8 and 9: In the "System" menu, set the "System Language" to US.
Dynavin N7/N7 Pro: In the "System" menu, set the "Region" to USA.
Dynavin N6: In the "Settings" menu, set the "Region" to USA.
Older Dynavin units only display time on the Radio in 24 hour time, On the navigation screens time display is configurable in the navigation system menu.
3d. How do I format a microSD card to increase the internal storage capacity on the Dynavin 8 or 9?
Click here for internal storage expansion instructions.
Alternately, from the Dynavin's main menu, go to the "System" menu > Internal Storage > and select "Apps Installation". It will automatically format the microSD card for installing apps from the Google Play store. Once done, it will ask you to restart the system.
3e. How do I toggle screen-mirroring and Android Auto/Apple CarPlay on/off via Z-Link? (D8 and D9 only)
From the main menu, select Z-Link. If you've already connected to CarPlay or Android Auto, put your phone in airplane mode. Then select the button indicated in the image below to toggle between CarPlay/Android Auto (blue icon) and screen-mirroring (red icon).
To set the "Default Connection Type", tap the hexagon icon at the bottom right corner to choose the default option at startup: "Link Mode First" (CarPlay/Android Auto), "Mirroring Mode First" (screen-mirroring), or "Last Mode" (the last one used).

3f: My phone won't pair with the Dynavin via Bluetooth.
If you have an iPhone, "FORGET" the device from your phone and do a hard reset (not just a restart but not a factory reset). You may have to google how to do this. If it's an Android phone, "FORGET" the device from your phone and restart. Then, manually reboot the Dynavin. If it's a Dynavin 8, use a paperclip to push in the reset button which may or may not be labeled "RST". Once both devices have rebooted, try the pairing process again.
If is connecting but then disconnecting randomly, update the firmware here.
To reset the Bluetooth pairing: Go to the Phone dial pad menu, then the Settings gear icon (Setup). Find "Select telephones" and tap the "X" next to the appropriate phone to remove the pairing. Next, if you have an iPhone, "FORGET" the device from your phone and do a hard reset (not just a restart but not a factory reset). You may have to Google how to do this for your particular phone. If it's an Android phone, "FORGET" the device from your phone and restart. Then reboot the Dynavin by holding down the main menu button (i.e. "MENU", "MODE" , "SRC" or a home icon button) until the screen goes blank. Finally, pair the phone with the Dynavin from your phone's Bluetooth setup (search for devices). The Dynavin will display as "Dynavin 8". The pin is 0000.
Dynavin N7 Pro: Go to the Phone dial pad menu, then the Settings gear icon (Setup), and tap "Bluetooth Reset". Next, if you have an iPhone, "FORGET" the device from your phone and do a hard reset (not just a restart but not a factory reset). You may have to Google how to do this for your particular phone. If it's an Android phone, "FORGET" the device from your phone and restart. Then reboot the Dynavin by holding down the main menu button (i.e. "MENU", "MODE" , "SRC" or a home icon button) until the screen goes blank. Finally, pair the phone with the Dynavin from your phone's Bluetooth setup (search for devices). The Dynavin will display as "Dynavin N7 PRO". The pin is 1234.
3g: How do I change the boot logo/startup screen image?
You can save a boot logo/startup image to the Dynavin using a USB drive that is 32gb or less or a microSD Card (if your Dynavin has an SD card slot). Compatible file types are JPG, JPEG, PNG, and BMP files. To ensure that the image fits the screen nicely, be sure it matches your radio's resolution. (For example, the D8 Mustang radios' resolution is 1280 x 720. And for the smaller 7" screens like on the BMW E46/E39/E53, the resolution is 1024 x 600.)
For the Dynavin 8 and 9, to set a custom startup screen a.k.a boot logo, load the compatible file image(s) onto your 32gb or less USB flash drive or microSD card using a computer. If using a USB flash drive, plug it into the "MEDIA" or "MDI & CP" USB port. If using a microSD card, insert it into the "MMC" or "SD" card slot on the front of the Dynavin (not available on some D8/D9 models). Next, go to the Dynavin's main menu and tap the "MEDIA" icon (on the D8 you'll then tap the icon in the upper left corner to select the source - select "USB" if using a USB drive or "Ext storage" if using a microSD card). Finally, select the image you want and tap the icon in the bottom left corner. It will confirm your selection with a green circled checkmark icon in the bottom left corner.
For the N7 Pro, the USB drive will not work if inserted into the iLink Pro USB port which is only for Apple CarPlay/Android Auto functionality. Make sure to use the "MEDIA" USB port. If using a USB drive, select "USB" from the main menu. If using a microSD card, select "SD" or "MMC" from the main menu. Select the image you want and tap the icon in the bottom left corner. It will confirm your selection with a green circled check mark icon in the bottom left corner.
*Click here to see how to upload the images to the Dynavin (once they are on an SD card): https://youtu.be/QHMB7dRc4zg?t=59
For adding images to AM/FM radio preset buttons, see 3h below. (Images cannot be added to SiriusXM preset buttons.)
3h. How do I assign images for AM/FM radio presets?
Click here for instructions for adding images to AM/FM radio preset icons. (Images cannot be added to SiriusXM preset buttons.)
3i. How do I enable SiriusXM radio?
If installed properly, there's nothing extra you have to do. On some previous model Dynavins, you may have to go to the "System" settings menu and change the Region to USA (N7 Pro) or change the "System Language" to US (Dynavin 8 & 9). Now go to the Radio. You should now see the SiriusXM option selectable "SAT" in the left bottom corner of the screen. If you don't, check all of your connections and make sure the antenna has good reception (out in the open not in a garage).
If you don't want to install the SiriusXM tuner, you can use the SiriusXM app via CarPlay or Android Auto and/or stream the audio from the app on your phone via Bluetooth. This will only work if your phone has a data connection whereas the SiriusXM tuner works anytime as long as it has satellite reception.
3j. What can I do if the unit or screen freezes?
Rarely the unit or screen may freeze. It happens with electronics and is ok if it's infrequent. To restart the unit manually, use a paperclip to push in the reset button. On some radios this is labeled "RST" (or not labeled at all). On the D8-MST2010 and D9-MST2010 radio, it is unlabeled at the bottom of the front of the unit. It is not a factory reset but will force it to fully restart. You can also hold down the "SRC", "MODE", "MENU", or "HOME" icon button for 10 seconds and let go.
It's always a good idea to force a restart as mentioned above after your installation is completed.
If this happens frequently, please contact support@dynavinnorthamerica.com for troubleshooting.
3k. My phone is not connecting to Apple CarPlay/Android Auto.
4. Firmware updates
4a: How do I update the firmware on my Dynavin?
Click here for FIRMWARE UPDATES.
4b: How do I update my GPS navigation/map software?
Dynavin 9: To update your navigation software, go to the "MAP UPDATES" menu from the Dynavin 9's main menu and follow the instructions on the screen. You will need a USB drive (minimum 16GB) formatted as NTFS. Once you've formatted it, you'll insert it into the "MDI & CP" USB port on the Dynavin. In the "MAP UPDATES" menu with the USB inserted, click "Confirm". Follow the instructions on the screen. When instructed to do so, visit flex.dynavin.com to download updates.
Dynavin 8: To update your navigation software, go to the "MAP UPDATE" menu from the Dynavin 8's main menu and follow the instructions on the screen. You will need a USB drive (minimum 16GB) formatted as NTFS. Once you've formatted it, you'll insert it into the "MEDIA" or "MDI & CP" USB port on the Dynavin 8. In the "MAP UPDATE" menu with the USB inserted, click "Confirm". Follow the instructions on the screen. When instructed to do so, visit www.naviextras.com or www.naviextras.com/shop/portal/deviceSelect. Find "Dynavin" then click on "Dynavin 8". You have 30 days from first use to get one free map update. You can also buy additional maps. Please contact NaviExtras.com for iGO Primo software-related tech support.
Dynavin N6/N7/N7 Pro: To update your navigation software, please visit www.naviextras.com or www.naviextras.com/shop/portal/deviceSelect. Select Dynavin the appropriate Dynavin model (N6, N7). Make sure your iGo Primo micro SD card is inserted into your computer. You don't have to register with NaviExtras.com to download maps. You have 30 days free updating through this service. You can also buy additional maps here. Please contact NaviExtras.com for questions regarding maps or for software tech support.